How to make your resume/CV in R
Updating CVs/resumes can be a frustrating process, especially when there are multiple versions you may have across time that you need to draw from during the update. In my case, if I want to include an experience on my new CV/resume from when I was in undergrad, I sometimes end up wasting a lot of time just trying to figure out which of the versions of my resume had that information! One of the ways to make this process slightly less frustrating is to have all of this information in one place and filter only the relevant experiences for the update. Fortunately, there are several options in R that facilitate this sort of workflow. In this post, I’ll discuss how I made my own resume in R using the datadrivencv package. You can find the final version as a PDF here and the source code here.
Deciding on a package to create the CV/resume
Before getting started, I’d like to walk you through my decision to use the datadrivencv package. I had a few specific requirements in mind:
- My primary criteria was that the data for the CV/resume could be stored in one place and allow me to filter out the information I didn’t want to include at the same time, to avoid the problem of trying to find information across multiple documents.
- The process for creating the CV/resume did not look like it would be incredibly time-consuming.
- I prefer to not have to mess with the formatting too much, so the aesthetic appeal of the documents provided by the package was also a big factor for me.
- Being able to dynamically create HTML and PDF documents as needed would be a nice bonus.
The option that I settled on based on these criteria was the datadrivencv package.
Storing the data in the CV/resume
I started the process of creating the CV/resume by following the steps provided here. In this post, I’ll provide suggestions to help clarify parts that I started to understand only after playing around with the code a little bit.
Before even stepping foot into R, let’s the create and store the dataset that we’ll be adding to the CV/resume. There are two options for data storage with this package: You can use either googlesheets or CSV files. For the googlesheets option, Nick Strayer (the author of this package) has kindly shared his googlesheet template here, which you can copy by clicking “File” -> “Make a copy” and edit from there with your data.
I went with the csv option, largely because it allows me to track my changes using Github. To automate the process of creating the csv files that will hold your resume/CV data, you can use the use_csv_data_storage() function from the datadrivencv package in R (make sure to have the package installed first!). Running use_csv_data_storage() (no need to add any arguments) in your console will create a folder called “data” with four csv files: “entries”, “language_skills”, “text_blocks”, and “contact_info”. Then, you can simply open each file and enter your data.
Depending on whether you are using googlesheets or csv files, you have either 4 “sheets” (googlesheets option) or 4 separate csv files (csv option). The reason for having separate sheets/csv files is to be able to change the formatting and/or location of your data based on the sheet/csv file they are stored in. I’ll walk you through what kind of information you can include in each (with the caveat that you can do whatever you want!).
Entries sheet/csv file is used to store data related to main text
The “entries” sheet is where you include the “typical” parts of your CV/resume that are in the main text, usually with entries that have dates associated with them (e.g., education, experience, presentations, etc.).
In the final version of the doc, things you enter into this sheet will be stored here:
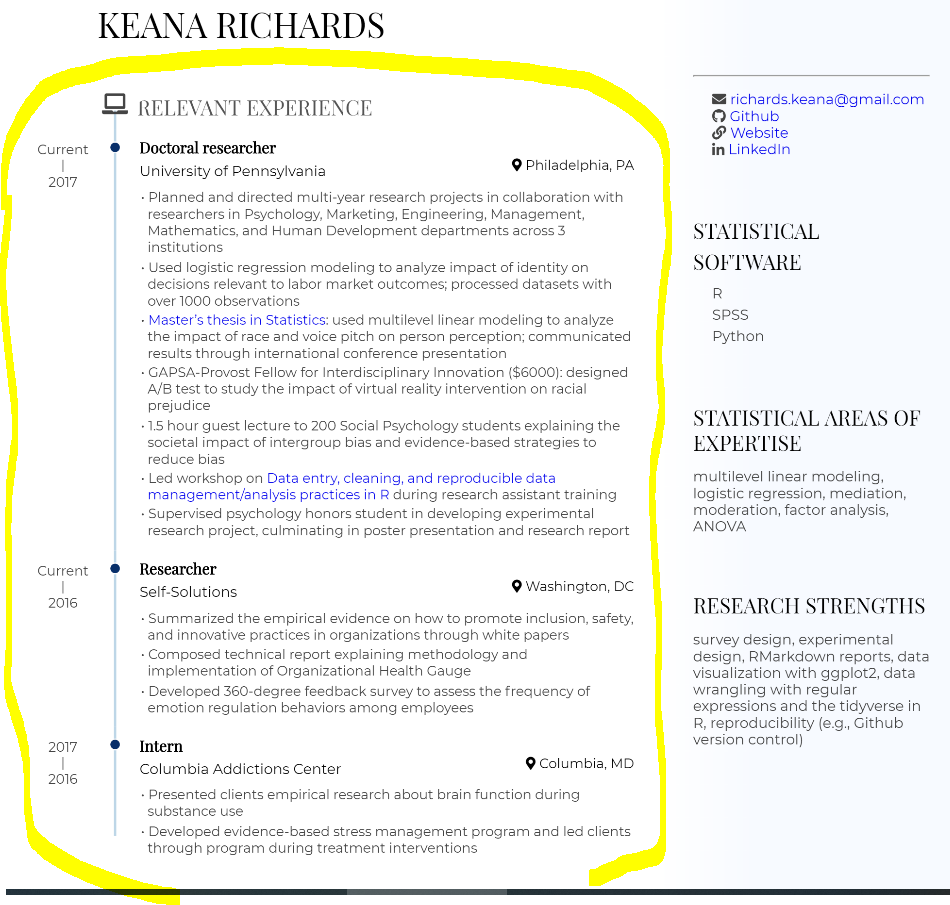
As you can see in the csv or googlesheets version of Nick Strayer’s templates that you copied/downloaded in the previous step, there are several different pieces of data associated with each entry. Some comments on the columns:
- the section column indicates the section that the entry is associated with when the CV/resume is created. Is it part of your education? Will it be listed under your relevant experience section?
- the loc and institution variables seem to be switched. This is important because one of the features of this template for the CV/resume is to attach a “map-marker” icon to whatever text is encoded as the location data. I didn’t want to spend too much time trying to edit the source code, so I just added the location information (e.g., Philadelphia, Pennsylvania) to the “institution” column and the institution information to the “loc” column.
- in “start” and “end” columns, you include the years the entry occurred, which are used to create the timeline on the left-hand side of each entry. For dates that didn’t last more than 1 year (e.g., from January to March of 2019), just include the year in the “end” column. If you want to include months, just enter that in addition to the year for the associated columns (e.g., “start” = “January 2017”, “end” = “February 2017”). For ongoing entries, you can leave the “end” entry blank and it will automatically have the end date set to “Current” on the timeline when the CV/resume is created.
- the text in each “description” column will be created as a separate bullet point. As suggested in the column title, you can add more bullet points by inserting a new column following the format of the previous columns (e.g., “description_4”)
- one of the best features (in my opinion) of this template is that it has a filter variable automatically included. For instance, if you want a certain entry only to be included in your CV, and not your resume, you can enter FALSE into the “in_resume” column. This allows for versatility in your output, which I will show you how to implement through R below.
Language skills sheet/csv file is used to store data for skillbars
The “language_skills” sheet is where you can store your ratings of the skillsets that you want to highlight using a skillbar. Although this sheet is called “language_skills”, in reality, it can serve as a way to highlight any set of skills (e.g., your research foci, your statistical areas of expertise). I’ve also seen resumes that use multiple skillbars to highlight different types of skillsets at the same time (see here for the PDF and here for how the “language_skills” sheet was edited). So there’s quite a bit of flexibility!
Even though you can change all of the data in the sheets/csv files without breaking the R code that is used to create the CV/resume, if you change the names of the sheets themselves (e.g., changing “language_skills” to “research_foci” in your googlesheet), you’ll need to edit the code in one of the functions called in the background. This is because the source code uses those specific names for the sheets/csv files to store the data in R. So I personally would recommend sticking with the “language_skills” name for the csv file, even if you call it something else on your actual resume. I’ll show you how to edit the titles for each section once we move into R.
Text blocks sheet/csv file is used to store information that will be placed outside of main text
The “text_blocks” sheet/csv file includes any information that will be placed outside of the main text. As shown in Nick Strayer’s template, this can include things like comments corresponding to the information in the main text, an introduction at the top of the page, among other options. For instance, the section circled below came from this sheet/csv file:

As mentioned in the second column title, the text in these blocks can read Markdown syntax (see this link for a great introductory guide on how to format text using Markdown), which allows you to format certain pieces of text (e.g., italicize the title of your position, link text to a URL).
Although this is the only section across the spreadsheets that explicitly mentions you can include Markdown syntax to format your text, it appears you can actually use Markdown syntax in nearly all text sections (at least the ones that I tested). For instance, if you want to bold the amount of funding you received for a project in one of the description columns under the “entries” sheet, you can use the Markdown syntax for bolding there.
Word of warning: I will say that trying to store bullets points like Markdown isn’t normally possible, but this is more of a fault of spreadsheets in general, which never let you include bullet points. I tried different ways of formatting the bullet points to see if it would be recognized as Markdown syntax, but in all cases, they weren’t created. There may be some hacky way of including bullet points through the cells themselves, but I didn’t want to spend too much time trying to figure it out since it wasn’t necessary for my own resume, so I just moved on without the bullet points there. For those interested, I’ll discuss how to include bullet points in the sidebar/outside of the main text once we start editing the formatting in R.
Contact info sheet/csv file is used to store data related to … your contact info!
This one is relatively self-explanatory, so I’ll only include a couple of quick comments. First, this section includes the option for Markdown syntax, so if you want to include a clickable hyperlink for certain entries (like I did for my website, github page, and LinkedIn) in the contact column, you can simply use the Markdown syntax to add a hyperlink.
Also, if you want to change the icons associated with each point of contact, you can find other options here. Simply change the text in the “icon” column to whatever visual you prefer to be associated with that contact information.
In the final version of the doc, things you enter onto this sheet will be stored here:

Creating the CV/resume using the datadrivencv package
Now that we have all of the data we need, let’s move into R to create the document.
First, make sure to install the package if you haven’t done so already. Next, I would recommend starting a Github repository and R project for CV/resume so you have somewhere to store all of the files that will be outputted in the next step and can start tracking your changes immediately.
If you are using CSV files to store you resume data, make sure to add the data folder that you created in the previous step to this R project.
With the “resume” (or whatever you decided to call it) R project open (so all of the files outputted in this step are stored in this project), you can run the use_datadriven_cv() function. For instance:
datadrivencv::use_datadriven_cv(
  full_name = "Nick Strayer",
  data_location = "https://docs.google.com/spreadsheets/d/14MQICF2F8-vf8CKPF1m4lyGKO6_thG-4aSwat1e2TWc",
  pdf_location = "https://github.com/nstrayer/cv/raw/master/strayer_cv.pdf",
  html_location = "nickstrayer.me/cv/",
  source_location = "https://github.com/nstrayer/cv",
  use_network_logo = FALSE
)
The defaults for the function automatically create a version of Nick Strayer’s CV, so we will need to edit the arguments to meet our needs.
You can enter ?datadrivencv::use_datadriven_cv into the console to learn about the arguments for this function.
A brief comment on some of the arguments that seem the most relevant:
- Enter your own name into the
full_nameargument - The
data_locationargument is where you enter either the googlesheet link or the name of the folder where your csv files are stored (if you used the default name of the folder created after using theuse_csv_data_storage()function, you would enterdata\here) - If you plan on posting pdf or html versions of your resume online, you can add the associated link to the
pdf_locationand/orhtml_locationarguments. This will add the links for each respective output type based on what the current output is. For instance, if you create a pdf version, it will include the link you provided to the HTML version of the file. - For the
source_locationargument, you can enter a link to your code. This link will be added to the final output for anyone whose reading your CV/resume to see how you made it. - The
use_network_logoargument is where you indicate whether you want an interactive network on your resume. I set theuse_network_logotoFALSE, just because I wanted to use that space for other things. However, if you don’t have any space constraints and like the aesthetic of the network, you can either setuse_network_logoto TRUE or just cut that line from the above code (since the default setting is to include the network).
When you run this code, several files will be created in your parent directory. The main ones we’ll be working with today are:
cv.rmd: This is the rmd file that will be knitted to create the final HTML or pdf outputrender_cv.r: This the code you will run when you are ready to knit the CV/resumedd_cv.css: If you want to make some small tweaks to formatting, this is where you can add thosecv_printing_functions.r: This is the source code that helps create the document. For instance, it creates the functions that are interspersed throughout thecv.rmddocument (e.g.,print_section()). Therefore, if you want to change the behavior of any of these functions (e.g., prevent hyperlinks from being added to the bottom of the output file), you can change them in this file
If you go to the cv.rmd file, you’ll see that there is an Aside section (sections in the Rmarkdown file are denoted by the equals sign) and a Main section. The Aside section is where you put any data that you want to have in the sidebar. The default behavior is to include the skillbars, contact information, and the text blocks (except for the introduction) in the sidebar. The Main section is where the main entries (from “entries” sheet/csv file) are placed. To change the subheadings for each section, you can edit them in the cv.rmd file (as I will demonstrate below in the small tweaks section).
Render the CV/resume
Now that you’ve added your data, to create the first draft of your CV/resume, all you need to do is go to the render_cv.r file to create the final output and the run the code! If you just want to create the HTML version, you can run the first block of code:
# Knit the HTML version
rmarkdown::render("cv.rmd",
									params = list(pdf_mode = FALSE),
									output_file = "cv.html")
And if you just want the PDF version, you can run the last two blocks of code:
# Knit the PDF version to temporary html location
tmp_html_cv_loc <- fs::file_temp(ext = ".html")
rmarkdown::render("cv.rmd",
									params = list(pdf_mode = TRUE),
									output_file = tmp_html_cv_loc)

# Convert to PDF using Pagedown
pagedown::chrome_print(input = tmp_html_cv_loc,
											 output = "cv.pdf")
Otherwise, if you’d like both versions of the CV/resume, you can run all code in the document and both will be outputted to your project directory. And voila - with just a few lines of code, we already have a beautiful document!
Adding small tweaks to original formatting/template
After knitting the first draft of my resume, there were a few small things that I wanted to change with the formatting and phrasing, which I will share here in case they’re helpful for you:
- I really wanted to remove some of the white space around the edges, which helped me keep the resume to only one page. To do this, you will have to edit the CSS file that is producing the formatting of the final document (in this case, the file called
dd_cv.css). This process can be time-consuming, if, like me, you not very familiar with HTML and you have to re-render the resume every time you want to test out what editing a certain piece of the CSS file will do. One recommendation I have to speed up this process is render your resume as an HTML and open it in your browser. Then, go to Developer Tools (may have a different name) and use the button “Select an element to inspect it”. With that button selected, click on the specific part of your resume that you want to edit. Check out this page for more info on how to use developer tools to test out how changing the code will affect formatting. I used the Developer Tools to reduce the size of the margins around the top and bottom of the document. To edit the margins in thedd_cv.cssfile, I went to the section calledOverride default right margin for sidebar, which originally only had two lines for the right and left margins. I added two lines to edit the top and bottom margins:
* {
  /* Override default right margin for sidebar*/
  --pagedjs-margin-right: 0.2in;
  --pagedjs-margin-left: 0.2in;
  --pagedjs-margin-top: .15in;
  --pagedjs-margin-bottom: .15in;
}
- Additionally, one feature I wanted to change was the default setting to extract the hyperlinks and store them at the end of the document. Instead, I wanted to be able to have clickable links throughout the document. After doing some searching through the code, I found the part of the code that performs this part of the process and edited slightly to my needs. Go to
cv_printing_functions.rand under thesanitize_links()function, comment out the lines that build a map of link destinations to superscripts and replace the link destination etc., like so:
# Remove links from a text block and add to internal list
sanitize_links <- function(cv, text){
  if(cv$pdf_mode){
    link_titles <- stringr::str_extract_all(text, '(?<=\\[).+?(?=\\])')[[1]]
    link_destinations <- stringr::str_extract_all(text, '(?<=\\().+?(?=\\))')[[1]]

    n_links <- length(cv$links)
    n_new_links <- length(link_titles)

    if(n_new_links > 0){
      # add links to links array
      cv$links <- c(cv$links, link_destinations)

      # Build map of link destination to superscript
      # link_superscript_mappings <- purrr::set_names(
      #   paste0("<sup>", (1:n_new_links) + n_links, "</sup>"),
      #   paste0("(", link_destinations, ")")
      # )

      # Replace the link destination and remove square brackets for title
      # text <- text %>%
      #   stringr::str_replace_all(stringr::fixed(link_superscript_mappings)) %>%
      #   stringr::str_replace_all('\\[(.+?)\\]', "\\1")
    }
  }

  list(cv = cv, text = text)
}
Part of the reason I comment this out (instead of deleting this function entirely) is because other functions within the code depend on the sanitize_links() function, and I didn’t want to spend too much time trying to edit the source code to account for the dependency there.
- Additionally, I removed the introduction for more space (simply delete that section from the text_blocks sheet/csv file)
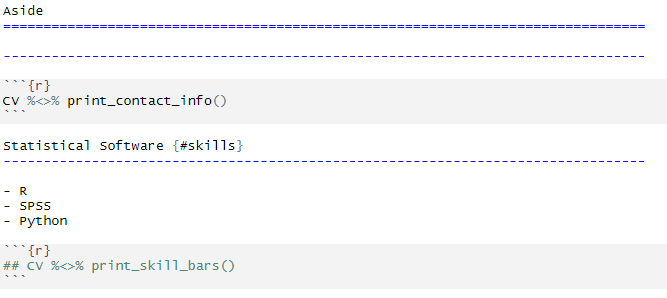
- Like I mentioned before, if you want your skill bars to reflect other skills (or you just prefer a different title for that section), you can change the name using the headers in the
cv.rmdfile. In my case, I changed the name from language skills to statistical software. I also removed the skills bars from this version of the resume, which was straightforward, you can just comment out theCV %<>% print_skill_bars()code chunk. - I also mentioned earlier that I would show you how to create bullets in the side bar if needed. Basically, I ended up creating bullet points under the
Asidesection. The only drawback of this approach is that some of your data is in the .rmd document itself, which is less than ideal.
Here is where I implemented both of these changes (new title for section and added bullet points) in the cv.rmd file:
- Finally, if you want to create different versions of the CV/resume by filtering out certain entries, make sure that you have edited the associated filter variables in the data files with what you want to include/exclude (e.g., by setting certain entries to TRUE/FALSE in the “in_resume” column from the entries sheet/csv file or by creating your own filter variable in a separate sheet/csv file as desired). Although the “in_resume” variable is only included in the “entries” sheet, to be able to do this sort of filtering in the other sheets/csv files, you can create a column in whichever sheet/csv file you want to filter (it should work even if you use the same variable name, “in_resume”, since the data from each sheet/csv file is stored separately). Then, go to the
cv.rmdfile, select the specific sheet/csv file with rows that you want to filter, and then write something like this:
entries_data <- entries_data %>%
  filter(in_resume)
If you want to filter other sections, you can see what the other sections are called by going to cv_printing_functions.r and look at the massive create_CV_object() function at the beginning of the code. Here’s a snippet of the part of the function where the names of the sections are stored:
    read_gsheet <- function(sheet_id){
      googlesheets4::read_sheet(data_location, sheet = sheet_id, skip = 1, col_types = "c")
    }
    cv$entries_data  <- read_gsheet(sheet_id = "entries")
    cv$skills        <- read_gsheet(sheet_id = "language_skills")
    cv$text_blocks   <- read_gsheet(sheet_id = "text_blocks")
    cv$contact_info  <- read_gsheet(sheet_id = "contact_info")
  } else {
    # Want to go old-school with csvs?
    cv$entries_data <- readr::read_csv(paste0(data_location, "entries.csv"), skip = 1)
    cv$skills       <- readr::read_csv(paste0(data_location, "language_skills.csv"), skip = 1)
    cv$text_blocks  <- readr::read_csv(paste0(data_location, "text_blocks.csv"), skip = 1)
    cv$contact_info <- readr::read_csv(paste0(data_location, "contact_info.csv"), skip = 1)
  }
So, if you wanted to filter entries in the text blocks section, you would write text_blocks instead of entries_data in the code above (with the assumption that your filter column is called “in_resume”).
And that’s it! You have officially made your resume in R!
Other resources
- There were several examples of CVs/resumes that I found especially inspiring, notably the
one from the author of the
datadrivencvpackage, Nick Strayer. You can find some other examples that I liked here and here. - The vitae and pagedown packages are also great alternative packages for making your CV/resume in R.
Keana Richards
Doctoral researcher
Studying psychology and statistics at the University of Pennsylvania.